 Several of my recent posts have been discussing my recent move to Amazon EC2 and updating, first to a LEMP stack, and then to a LEPP stack, which all provided great speed increases. However, can you really be satisfied with a slightly faster loading WordPress blog, especially when my CPU was dying regularly with 100% usage? I certainly couldn't, especially when YSlow was giving me such a bad rating that I had really no control over…
Firstly, a big shout out must go to Nesbot.com; he was so kind to share his custom blog code that he built using SlimPHP. Of course I had to add a few features myself – including my fancy Twitter slider – and an importer from my WordPress blog into this new blog structure.
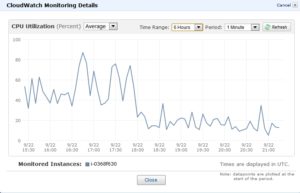
If you look at the screenshot to the right, you can see exactly when I switched two other sites to use this code on the 22nd of September!
The goal of this code is all about speed. There is no database behind it! Everything is statically created and loaded; hence, the need for the WordPress exporter. Instead of requesting each blog from the database, the blogs are generated via a script and requested through PHP loading static PHP files.
Here is an example of what one blog posts looks like:
The first three lines are the only special things going on. The remainder beneath that is just the actually blog post itself. The first line contains the title of the blog post – this is used for displaying the list of posts on the home page.
The second line is for associated tags. The post generator script will pull these out and store them in an object to access them within the code (this was my first custom feature).
The third line is for the publish date. By default, the posted date is stored in the blog filename; however, my previous blog didn’t follow this structure, so I had to make a few alterations to update it (this was my second custom feature).
The beautiful part of this is that I am still using WordPress for what it's truly good for – the fully fledged admin site! So posting a new blog consists of creating the blog post as normal in the admin site. Once posted I need to run two PHP scripts to export and populate the posts.
Since I like to schedule my blog posts, I've created a cron job that will execute the following commands:
That's it; the site will then be freshly updated with the latest content.
You may now notice that the site is much, much faster. In fact it's so fast, I removed the need for splitting into multiple pages. Instead all of my – over 120+ posts – are listed on the homepage; hopefully it was so fast you didn't even notice! Published on Sep 24, 2012 Tags: Optimization
| Theory
| PHP
| slimphp
Did you enjoy this article? If you did here are some more articles that I thought you will enjoy as they are very similar to the article
that you just finished reading.
No matter the programming language you're looking to learn, I've hopefully compiled an incredible set of tutorials for you to learn; whether you are beginner
or an expert, there is something for everyone to learn. Each topic I go in-depth and provide many examples throughout. I can't wait for you to dig in
and improve your skillset with any of the tutorials below.
<?/*Amazon EC2 Shoutout!*/?>
<?/*amazon ec2|amazon-ec2,micro hosting|micro-hosting,Theory|theoyr*/?>
<?/*2012-9-5*/?>
<a href="https://content.endyourif.com/wp-content/uploads/2012/09/shout-out.jpg"><img class="alignright size-medium wp-image-703" title="shout-out" src="https://content.endyourif.com/wp-content/uploads/2012/09/shout-out-300x211.jpg" alt="" width="300" height="211" /></a>I was previously hosting all of my sites with GoDaddy, using one of their unlimited domain hosting services.  While this was pretty inexpensive compared to similar services, I was never truly happy with the load time.  Often taking over 1.2 seconds to load this blog!<br />
<br />
…
php5 export.php
php5 genposts.php
Related Posts
Tutorials
Learn how to code in HTML, CSS, JavaScript, Python, Ruby, PHP, Java, C#, SQL, and more.

